by James Anderson | Last Updated on February 17, 2023
 As a beginner, I knew I had to look for how to set up MIG welder in a simple to follow the procedure to avoid certain complications.
Learning to set up the MIG welder appropriately has tremendously helped me to increase efficiency and reduce risks of errors and accidents when welding large pieces of metals.
Table of Contents
How Many Watts Does MIG Welder Use?
In most cases, MIG Welder will require up to 120V powered by 70 amp, to complete most welding. In this case, you will require a power generator with a minimum of 8400 watts to run the MIG welder successfully.
If you know the wattage and would like to calculate the required amperage to power the Welder than you can use the formula; Amperage = wattage/voltage.
Voltage Settings and Polarity Type in MIG Welding
Setting the voltage and polarity of your welder can be daunting in the beginning but you will surely get used to it fast. With wrong polarity setting your welds will appear nasty. If you are using a gasless MIG welder, you should set the polarity at a DC Electrode negative which is also referred to as DCEN. In this case the positive terminal is grounded while the negative terminal is connected to the negative electrode which is in the MIG gun.
For the gas-powered MIG welder, you should set the polarity at Direct Current Electrode Positive and the current will flow in reverse direction through the ground cable and then into the MIG gun.
Setting Up Your MIG Welding Equipment- The Steps and Guide
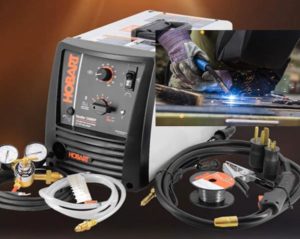
Make sure the welder has enough gas within. Also, you need to make sure that the welding wire has been threaded properly. All safety equipment and components of the machine must be included and accounted for.
Step 1: How to Set the Gas Flow in Your MIG Welder
Your first step is to move your fume extractor over to the welding region. Turn this machine on and it will detect fumes for extraction automatically. Simply attach the ground clamp which can attach to any metal surface to secure your machine to the ground. You may need a setup table for MIG welding to complete this step.
Make sure the adjustment screw has been loosened. You will find the adjusting screw labeled on the gas cylinder. Once the screw is loose, open the cylinder with a handwheel, making sure your hand is holding to the wheel and not on top. This will help prevent accidents if components are released with high pressure.
Once you open the handwheel, the pressure gauge value will return to zero. The maximum pressure on the gauge is 2500 PSI, I was able to discover that you will need a little over 1000 PSI pressure to weld metals efficiently.
Once the pressure is set your next step is to turn on the adjusting screw. Turn the adjusting screw in a clockwise motion until that pointing needle located on the gauge reaches 10 to 15 CHF. With the completion of the first few steps, you can proceed to choose your welding settings.
Step 2: Determine and Set Your Welding Settings
There is no need to panic about setting your welding, simply check the panel located at the side of your welding unit for details. The panel will help you determine the right voltage and wire speed. For the basic welding setup, the wire size is 0.035 inches. It is also important to check the gas composition on the cylinder which in most cases is 75% Argon, and 25% CO2.
You will need to determine the thickness of the material you are about to weld. Once you know the thickness of the metal you want to weld, simply find corresponding voltage and wire speed on the panel of the welding unit.
Now that you have set the parameters, your next step is to turn on the welder. Do this by turning the switch circle which is the black lever that goes up and down. For the simple welding unit, the slowest speed for the wire you can choose is 50. This means the wire will be fed once you pull the gun.
I will recommend that you adjust the wire speed and voltage accordingly according to the chat on the panel on the side of the unit. If for instance, the metal you want to weld is 18ga, you may require 120V and 16 for the voltage and wire speed, respectively.
Pay attention to the welding torch and ensure that it has an appropriate wire amount. If the wire is excessively long, simply clip it to the right length.
Step 3: Complete Your Welding and Unpack the Welding Unit
Now that you are done with the setting, simply weld your metal works. Once completed, turn the wire speed up to it’s lowest setting which in most cases is 50.
Close the valve of the gas cylinder by using the handwheel. Make sure you close enough until the handwheel becomes tight. It is also important that you bleed the welding unit’s regulator. Do this by depressing the gun’s trigger until the CHF level has dropped to its lowest.
The next step is to unscrew the welding unit’s adjusting screw. Continue to unscrew the adjusting screw until it loosens completely. Turn off the welding unit with the ON/OFF switch. Once the unit is turned off, simply detach the ground clamp from the welding table. The last step to take is to ensure that the wires are neatly coiled and put in place.
Conclusion
Now that you have successfully put your MIG welding units together, you should begin your welding works immediately. One of the versatility features of this method of welding is that you can always make adjustments to the speed, voltage, or wire length while you weld, without compromising your safety.
When properly installed, you can conveniently and continuously feed the wire used for welding to improve the speed alongside the quality of welding. With constant practice, you will discover how quickly your overall control of welding operations improve. For safety reasons, you should increase the voltage and speed for your welding works slowly. Most Welding works can be completed with low to moderate gas pressure.

Hi, I am James Anderson from Sandy, Utah. Welding has always been part of my life and I love to share my wealth of experience. I have a team of professionals who are knowledgeable about different welding processes. I hope you will be educated and informed on this website, to become better welders.